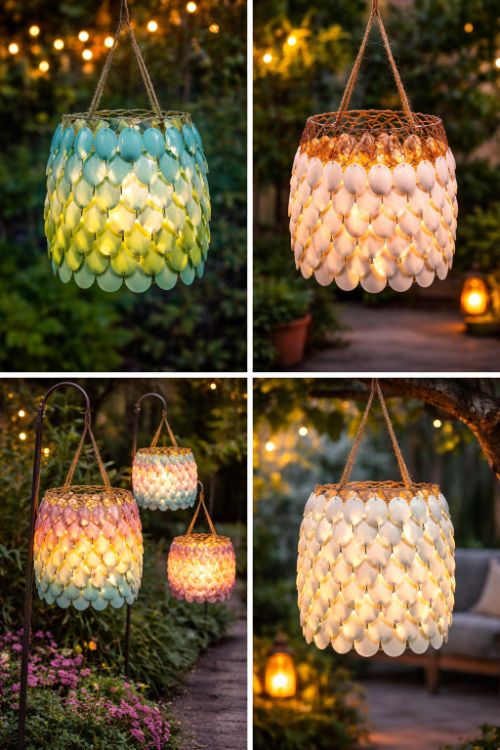
Begin by cutting the wire mesh to the desired size.
The dimensions will depend on how large you want your lantern to be. Many people choose a cylindrical shape because it is simple to construct and provides an attractive finished look.
Carefully roll the mesh into a cylinder and secure the edges using wire or by bending the mesh ends together.
Once secured, check that the frame is stable and maintains its shape.
Step 2: Prepare the Plastic Spoons
For this project, only the spoon bowls are typically visible in the finished design.
Using scissors or cutters, carefully remove the handles if desired.
Some creators leave short portions of the handles attached to help with fastening, while others remove them completely depending on their preferred method.
Always use caution when cutting plastic materials.
Step 3: Create the Layered Pattern
The secret behind the lantern's elegant appearance lies in the overlapping arrangement.
Attach each spoon so the curved portion faces outward.
Work from the bottom upward, slightly overlapping each row to create a scale-like effect.
This layered design helps diffuse the light and creates a decorative texture that resembles handcrafted glass or shell ornaments.
As additional rows are added, the lantern gradually develops its signature appearance.
Step 4: Install the Lighting
Once the outer shell is complete, place LED string lights or a battery-powered LED light inside the frame.
Many DIY enthusiasts prefer warm white lighting because it creates a cozy atmosphere during the evening.
The layered spoon surface softens the light and produces a gentle glow that works beautifully in outdoor spaces.
Step 5: Add Finishing Touches
One of the best aspects of this project is the ability to customize the design.
Popular options include:
- Soft pastel colors
- Metallic finishes
- Ombre color effects
- Frosted coatings
- Natural white finishes
You can also experiment with different lantern shapes, including round, oval, or tapered designs.